
Linux: Chapter3:
Linux structure and Installation
SECTION 1 Linux Filesystems
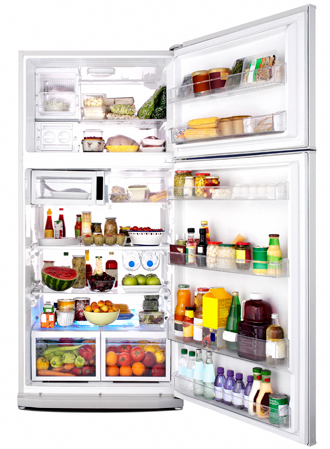
Think of a refrigerator that has multiple shelves that can be used for storing various items. These shelves help you organize the grocery items by shape, size, type, etc. The same concept applies to a filesystem, which is the embodiment of a method of storing and organizing arbitrary collections of data in a human-usable form.
Different Types of Filesystems Supported by Linux:
- Conventional disk filesystems: ext2, ext3, ext4, XFS, Btrfs, JFS, NTFS, etc.
- Flash storage filesystems: ubifs, JFFS2, YAFFS, etc.
- Database filesystems
- Special purpose filesystems: procfs, sysfs, tmpfs, debugfs, etc.
Partitions and Filesystems
Linux systems store their important files according to a standard layout called the Filesystem Hierarchy Standard, or FHS. You can download a document that provides much greater detail here, or look up the original source documents on the Linux Foundation website. This standard ensures that users can move between distributions without having to re-learn how the system is organized.
A comparison between filesystems in Windows and Linux is given in the following table:
| Windows | Linux | |
| Partition | Disk1 | /dev/sda1 |
| Filesystem type | NTFS/FAT32 | EXT3/EXT4/XFS... |
| Mounting Parameters | DriveLetter | MountPoint |
| Base Folder where OS is stored | C drive | / |
The Filesystem Hierarchy Standard
Linux systems store their important files according to a standard layout called the Filesystem Hierarchy Standard, or FHS. You can download a document that provides much greater detail here, or look up the original source documents on the Linux Foundation website. This standard ensures that users can move between distributions without having to re-learn how the system is organized.

Linux uses the ‘/’ character to separate paths (unlike Windows, which uses ‘\’), and does not have drive letters. New drives are mounted as directories in the single filesystem, often under /media (so, for example, a CD-ROM disc labeled FEDORA might end up being found at /media/FEDORA, and a file README.txt on that disc would be at /media/FEDORA/README.txt).

Picture aboves show you that there might be differences from tutorials since it's Kali Linux which downstream for Debian family. There are many approaches to get things done. Please use any commands you preferred. For me, I would recommend to use command line since it covers all things in all Distros as well.
↞ Section break ↠
Different approaches from different Distro families to find system stuffs by using Graphical User Interface(GUI). Below sample shows only one.

SECTION2 The boot process


POST (Power On Self Test) Process --> screen+keyboard+main memory
Master Boot Records (MBR) and Boot Loader
Once the POST is completed, the system control passes from the BIOS to the boot loader. The boot loader is usually stored on one of the hard disks in the system, either in the boot sector (for traditional BIOS/MBRsystems) or the EFI partition (for more recent (Unified)Extensible Firmware Interface or EFI/UEFI systems). Up to this stage, the machine does not access any mass storage media. Thereafter, information on the date, time, and the most important peripherals are loaded from the CMOS values (after a technology used for the battery-powered memory store - which allows the system to keep track of the date and time even when it is powered off).
A number of boot loaders exist for Linux; the most common ones are GRUB (for GRand Unified Boot loader) and ISOLINUX (for booting from removable media). Most Linux boot loaders can present a user interface for choosing alternative options for booting Linux, and even other operating systems that might be installed. When booting Linux, the boot loader is responsible for loading the kernel image and the initial RAM disk (which contains some critical files and device drivers needed to start the system) into memory.
A number of boot loaders exist for Linux; the most common ones are GRUB (for GRand Unified Boot loader) and ISOLINUX (for booting from removable media). Most Linux boot loaders can present a user interface for choosing alternative options for booting Linux, and even other operating systems that might be installed. When booting Linux, the boot loader is responsible for loading the kernel image and the initial RAM disk (which contains some critical files and device drivers needed to start the system) into memory.
Boot Loader in Action: The boot loader has two distinct stages:
 First Stage:
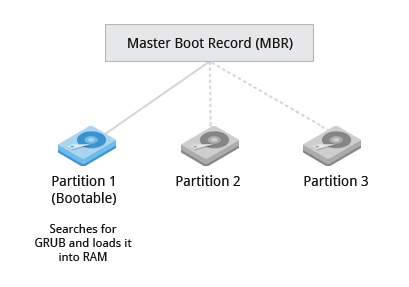
For systems using the BIOS/MBR method, the boot loader resides at the first sector of the hard disk also known as the Master Boot Record (MBR). The size of the MBR is just 512 bytes. In this stage, the boot loader examines the partition table and finds a bootable partition. Once it finds a bootable partition, it then searches for the second stage boot loader e.g, GRUB, and loads it into RAM (Random Access Memory).
For systems using the EFI/UEFI method, UEFI firmware reads its Boot Manager data to determine which UEFI application is to be launched and from where (i.e., from which disk and partition the EFIpartition can be found). The firmware then launches the UEFIapplication, for example, GRUB, as defined in the boot entry in the firmware's boot manager. This procedure is more complicated but more versatile than the older MBR methods.
For systems using the EFI/UEFI method, UEFI firmware reads its Boot Manager data to determine which UEFI application is to be launched and from where (i.e., from which disk and partition the EFIpartition can be found). The firmware then launches the UEFIapplication, for example, GRUB, as defined in the boot entry in the firmware's boot manager. This procedure is more complicated but more versatile than the older MBR methods.
Second Stage:
The second stage boot loader resides under /boot. A splash screen is displayed which allows us to choose which Operating System (OS) to boot. After choosing the OS, the boot loader loads the kernel of the selected operating system into RAM and passes control to it.
The boot loader loads the selected kernel image (in the case of Linux) and passes control to it. Kernels are almost always compressed, so its first job is to uncompress itself. After this, it will check and analyze the system hardware and initialize any hardware device drivers built into the kernel.
The boot loader loads the selected kernel image (in the case of Linux) and passes control to it. Kernels are almost always compressed, so its first job is to uncompress itself. After this, it will check and analyze the system hardware and initialize any hardware device drivers built into the kernel.
The Linux Kernel
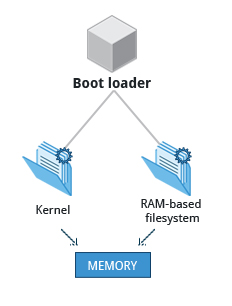
The boot loader loads both the kernel and an initial RAM–based file system (initramfs) into memory so it can be used directly by the kernel.
When the kernel is loaded in RAM, it immediately initializes and configures the computer’s memory and also configures all the hardware attached to the system. This includes all processors, I/O subsystems, storage devices, etc. The kernel also loads some necessary user space applications.
When the kernel is loaded in RAM, it immediately initializes and configures the computer’s memory and also configures all the hardware attached to the system. This includes all processors, I/O subsystems, storage devices, etc. The kernel also loads some necessary user space applications.
The Initial RAM Disk
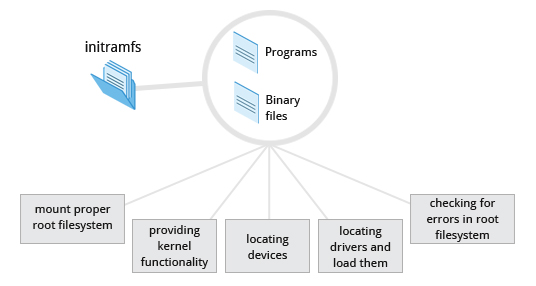
The initramfs filesystem image contains programs and binary files that perform all actions needed to mount the proper root filesystem, like providing kernel functionality for the needed filesystem and device drivers for mass storage controllers with a facility called udev(for User Device) which is responsible for figuring out which devices are present, locating the drivers they need to operate properly, and loading them. After the root filesystem has been found, it is checked for errors and mounted.
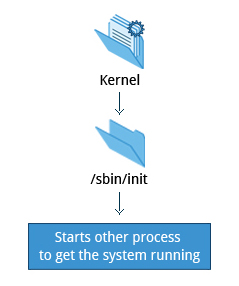
The mount program instructs the operating system that a filesystem is ready for use, and associates it with a particular point in the overall hierarchy of the filesystem (the mount point). If this is successful, the initramfs is cleared from RAM and the init program on the root filesystem (/sbin/init) is executed.
init handles the mounting and pivoting over to the final real root filesystem. If special hardware drivers are needed before the mass storage can be accessed, they must be in the initramfs image.
/sbin/init and Services
Once the kernel has set up all its hardware and mounted the root filesystem, the kernel runs the /sbin/init program. This then becomes the initial process, which then starts other processes to get the system running. Most other processes on the system trace their origin ultimately to init; the exceptions are kernel processes, started by the kernel directly for managing internal operating system details.
Traditionally, this process startup was done using conventions that date back to System V UNIX, with the system passing through a sequence of runlevels containing collections of scripts that start and stop services. Each runlevel supports a different mode of running the system. Within each runlevel, individual services can be set to run, or to be shut down if running. Newer distributions are moving away from the System V standard, but usually support the System V conventions for compatibility purposes.
Besides starting the system, init is responsible for keeping the system running and for shutting it down cleanly. It acts as the "manager of last resort" for all non-kernel processes, cleaning up after them when necessary, and restarts user login services as needed when users log in and out.
Remark: startx from the command line to start X Window or GUI environment
Section 3: Choosing a Linux Distribution
Your family is planning to buy its first car. What are the factors you need to consider while purchasing a car? Your planning depends a lot on your requirements. For instance, your budget, available finances, size of the car, type of engine, after-sales services, etc.
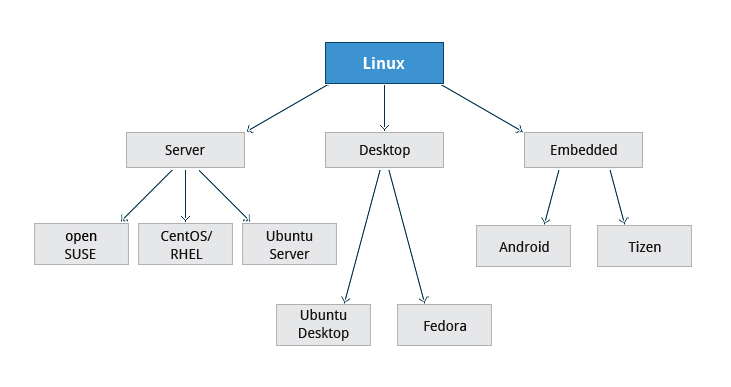
Similarly, determining which distribution to deploy also requires some planning. The figure shows some but not all choices, as there are other choices for distributions and standard embedded Linux systems are mostly neither Androidor Tizen, but are slimmed down standard distributions.
Similarly, determining which distribution to deploy also requires some planning. The figure shows some but not all choices, as there are other choices for distributions and standard embedded Linux systems are mostly neither Androidor Tizen, but are slimmed down standard distributions.

Linux Installation: Planning
More About Planning in Linux Installation
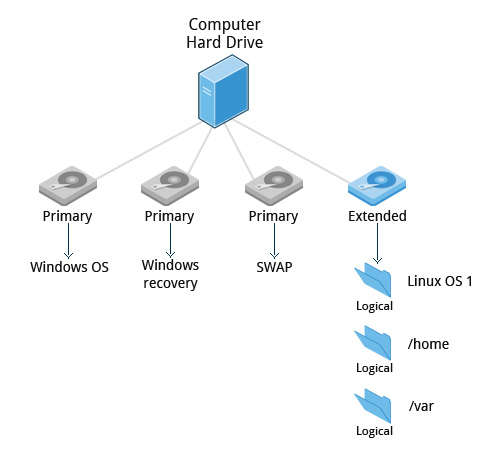 partition layout needs to be decided at the time of installation because Linux systems handle partitions by mounting them at specific points in the filesystem. You can always modify the design later, but it always easier to try and get it right to begin with.
Nearly all installers provide a reasonable filesystem layout by default, with either all space dedicated to normal files on one big partition and a smaller swap partition, or with separate partitions for some space-sensitive areas like /home and /var. You may need to override the defaults and do something different if you have special needs, or if you want to use more than one disk.
Linux Installation: Install Source
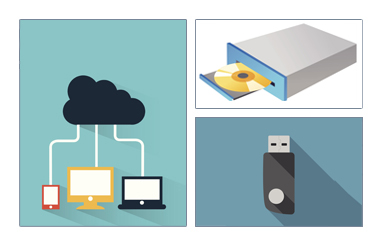
Like other operating systems, Linux distributions are provided on optical media such as CDs or DVDs. USB media is also a popular option. Most Linux distributions support booting a small image and downloading the rest of the system over the network; these small images are usable on media or as network boot images, making it possible to install without any local media at all.
Many installers can do an installation completely automatically, using a configuration file to specify installation options. This file is called a Kickstart file for Fedora-based systems, an AutoYAST profile for SUSE-based systems, and a preseed file for the Debian-based systems.
Each distribution provides its own documentation and tools for creating and managing these files.

Linux Installation: The Warning
IMPORTANT!
The demonstrations show how to install Linux directly on your machine, erasing everything that was there. While the demonstrations will not alter your computer, following these procedures in real life will erase all current data. The Linux Foundation has a document available here that describes alternate methods of installing Linux without over-writing existing data that you may want to consult if you need to preserve the information on your hard disk.
These alternate methods are:
Re-partitioning your hard disk to free up enough room to permit dual boot (side-by-side) installation of Linux along with your present operating system.
Using a host machine hypervisor program (such as VMWare's products or Oracle Virtual Box) to install a client Linux Virtual Machine.
Booting off of and using a Live CD or USB stick and not writing to the hard disk at all.
The first method is sometimes complicated and should be done when your confidence is high and you understand the steps involved. The second and third methods are quite safe and make it difficult to damage your system.
↞ Summary ↠These alternate methods are:
Re-partitioning your hard disk to free up enough room to permit dual boot (side-by-side) installation of Linux along with your present operating system.
Using a host machine hypervisor program (such as VMWare's products or Oracle Virtual Box) to install a client Linux Virtual Machine.
Booting off of and using a Live CD or USB stick and not writing to the hard disk at all.
The first method is sometimes complicated and should be done when your confidence is high and you understand the steps involved. The second and third methods are quite safe and make it difficult to damage your system.
Reference:


No comments:
Post a Comment